
Background
In the production of Viking and Anglo-Saxon swords, pattern welding was a technique that involved forge-welding different types of iron and steel together to create interesting patterns on the finished blade. The results are often mistakenly called Damascus steel, which is a misnomer I will explain below. In pattern welding, a pattern is created through manipulating different types of steel by twisting or controlled removal of material. The iron or steel used must be contrasting so that they are optically different and should be visible at the surface of the sword. The Viking and Anglo-Saxon sword makers used pattern welding as a technique to create unique and visually striking blades. I suspect that at first it was mostly to refine the materials bladesmiths were working with and to help achieve the desired mix of hardness and toughness. Although modern steelmaking methods no longer require this technique, it is still used by contemporary swordsmiths for its cosmetic effect.
Forge-welding is a method in which two or more pieces of metal are fused together under high temperature by hammering, squeezing or twisting. The heat allows different pieces of metal to be fused together creating a single piece of metal. This technique is commonly used in blacksmithing and knife making to join together different types of metal, such as iron and steel. The process of forge-welding requires skill and is a time-consuming task, but it creates a strong and durable bond between the metal pieces. I demonstrate the forge-welding process in many of my videos.
Examples of Pattern Welding in Sword Blades
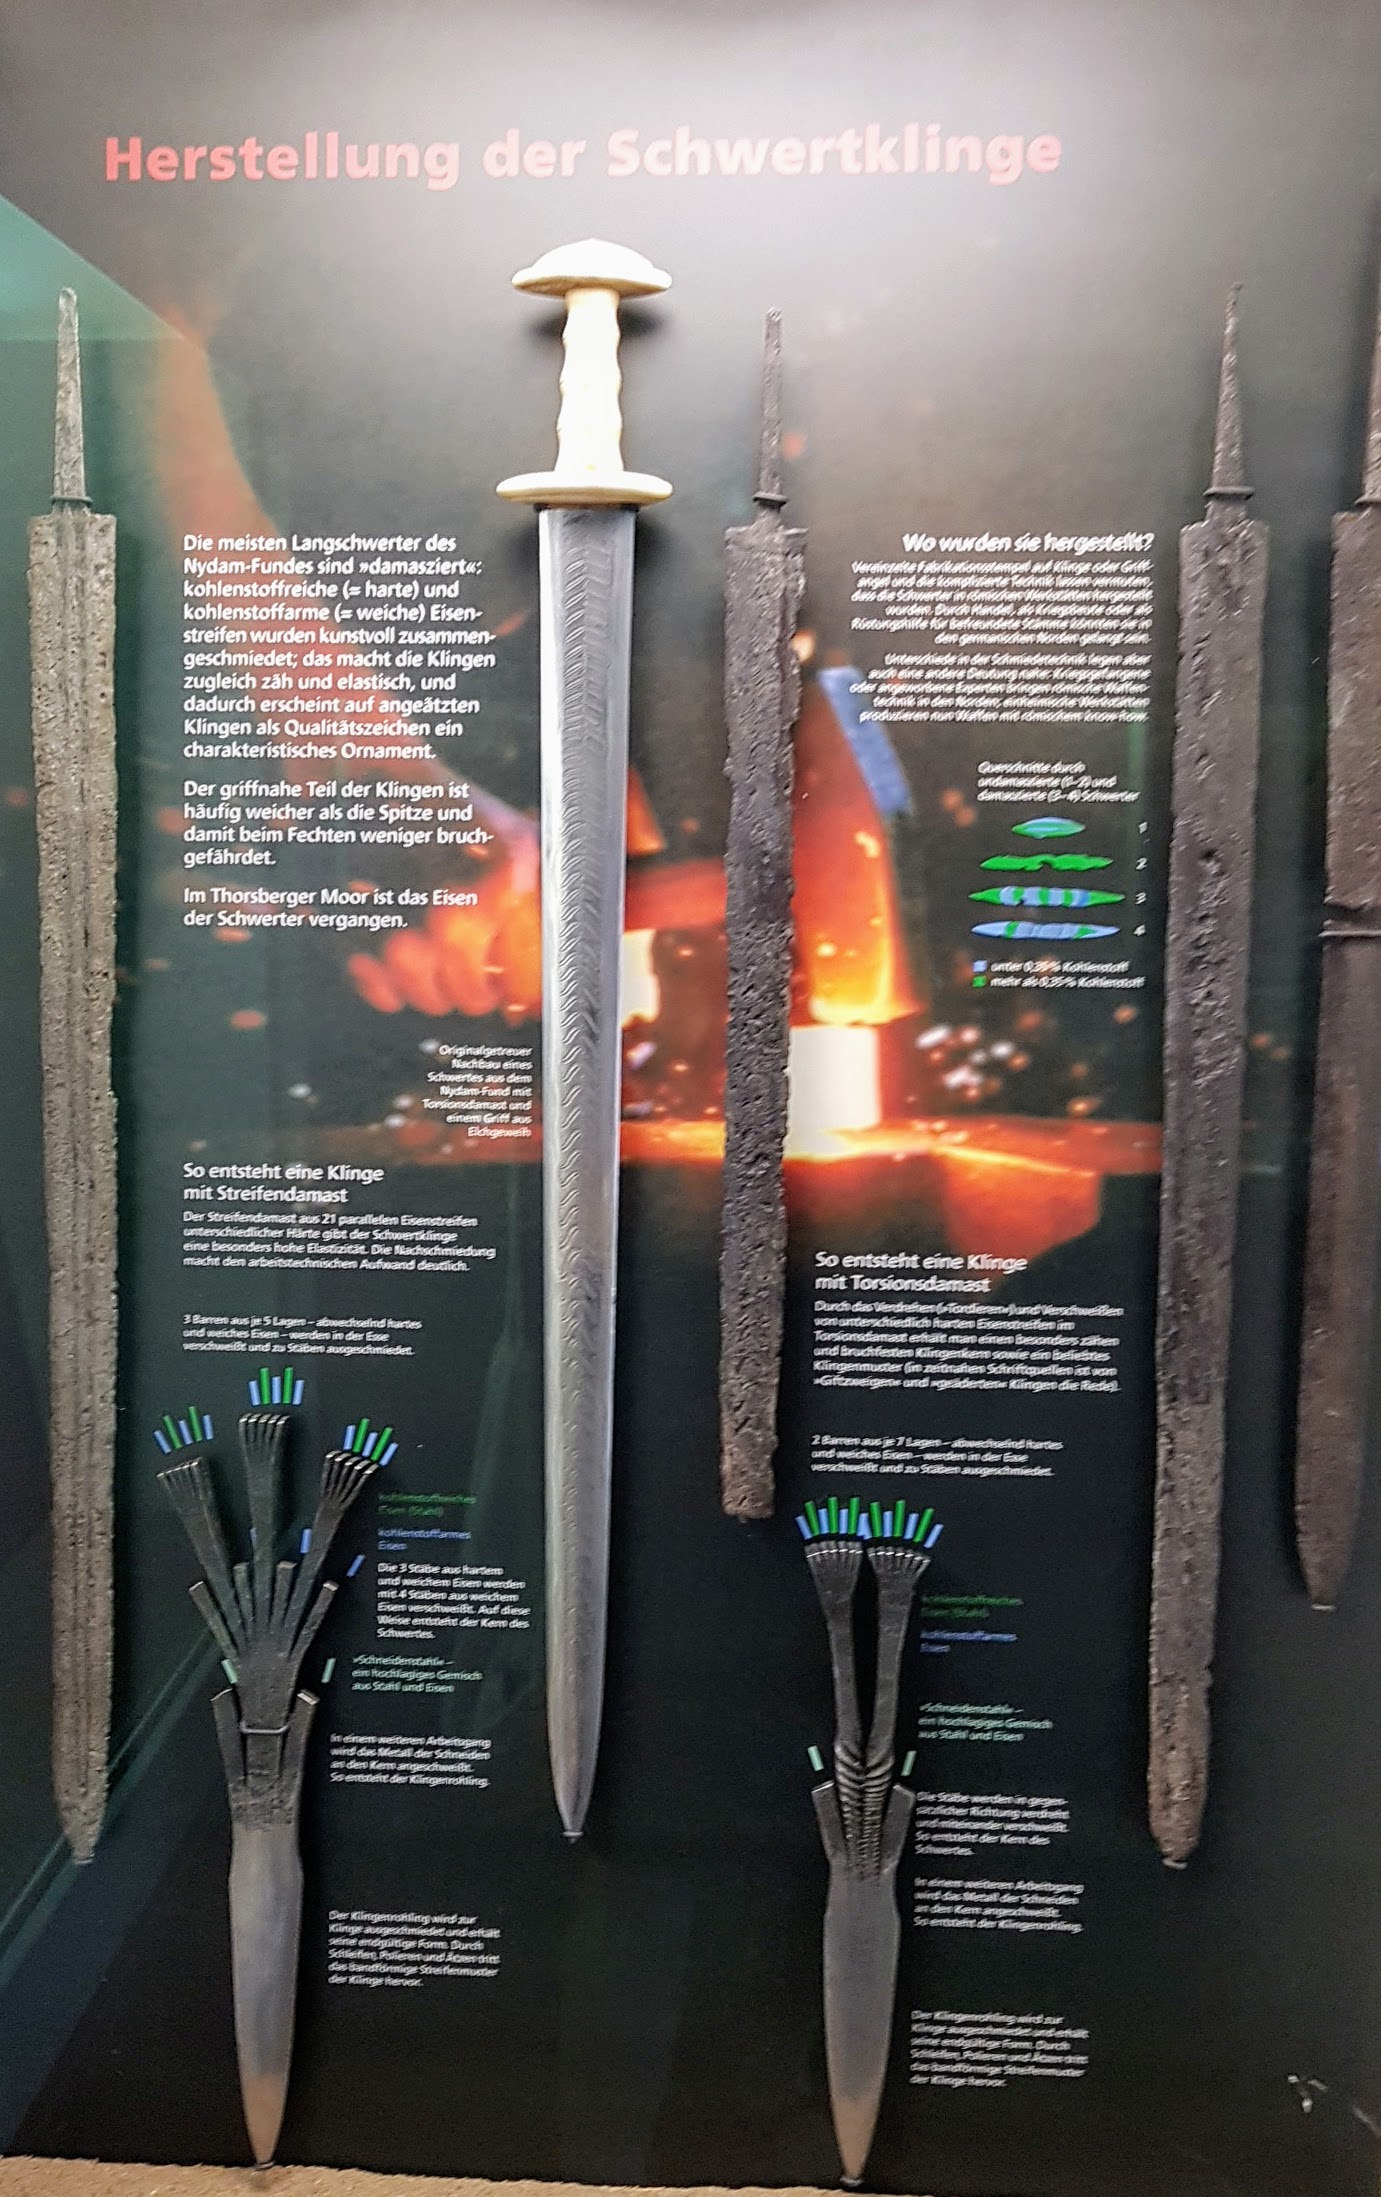
Pattern welded blades were popular in Northern Europe from approximately 200 AD to 1000 AD, including the Migration Period through the Viking Age. They were used by various cultures throughout this time period, including the Celts, the Germanic tribes, and the Vikings. An early example of pattern welding is found in the Illerup Ådal find - a significant discovery of pattern-welded swords from the Roman Iron Age. Below are some historical examples of pattern-welded blades from the Nydam and Mosegaard Museum in Denmark; you can click on the images to see a larger version.


Pattern welding is still popular with contemporary bladesmiths both for visual effect and for recreating historic patterns and swords. Twisted patterns are particularly popular and most pictures below show patterns that were created by twisting.


Materials for Pattern Welding
To achieve the visual effects shown in the pictures above, the materials are often combined in alternating layers during forge-welding and need to be optically different enough to create a visible pattern. Here are some common contrast choices:
- low-carbon versus high-carbon: high-carbon steel usually shows up darker than low-carbon steel. Some modern steel choices for that might be 1015 (low-carbon) vs 1085 (high-carbon)
- low-nickel vs high-nickel: nickel shows up as very bright and is not a common ingredient in most modern steels; a US version of high nickel steel is 15n20.
- low-phosphorous vs high-phosphorous: phosphorous is not usually a desirable ingredient in steel as it can lead to embrittlement. A source of high phosphorous wrought iron are the pieces of the Globe grain elevator in Wisconsin. Unfortunately, it is challenging to work with as it tends to shear during twisting.
The number of layers in a pattern-welded blade determines the intricacy of the finished pattern. While historical blades typically featured a small number of layers - less than 20, modern blades often incorporate a significantly higher layer count to produce more elaborate and detailed designs.


Single Twist
One of the most popular pattern in pattern-welded blades stems from twisting a stack of alternating steels. It is difficult to illustrate this in practice as you can see in many of my videos on twisting pattern welded bars. Below is an example screen shot of me working on a Viking broad seax.

However, using a computer simulation, I created an animation that shows how a stack of contrasting steel is twisted and how the successive removals of material reveal different patterns. This makes it much easier to understand the mechanics and steps to arrive at a particular pattern; view the videos in full screen to see the details.
Here is a render that shows the pattern development in a twisted bar. If you enjoy the illustration, I am also selling t-shirts (Variant 1) (Variant 2) with the pattern on them. Credit for this type of illustration goes to Ypey who provided a hand drawn illustration of the pattern development in a twisted bar (“Europäische Waffen mit Damaszierung. Archäologisches Korrespondenzblatt 12 (1982)”).

Opposing Twists
The direction of the twist uniquely determines the orientation of the resulting pattern. Independent of the rotation of the twisted bar, the pattern stays in the same orientation. This may be a little bit counterintuitive at first, but is similar to the right hand rule in physics for figuring out the vector cross product. To compose more interesting patterns, one can twist two bars in opposing directions and then combine them. This is illustrated in the video below and is a very common technique for pattern welded blades:
How it all comes together in a sword blade
Because it so challenging to visualize how pattern-welded twisted rods get combined into a sword blade, I created computer visualizations for that as well. The actual bladesmithing process is quite exciting and challenging, as these bars need to be forge-welded together at high temperatures and even small errors can lead to complete failure. You can watch this process in my video on forging a pattern-welded broad seax.


There is also a conceptual example of this process done in steel displayed at the Museumsinsel Schloss Gottorf.
More complex patterns
The examples provided here are just the beginning of what is possible with pattern-welding. While I tend to stay with simple historically plausible patterns, modern bladesmiths make swords and knives with incredibly complex patterns, e.g. ladder, basket weave, exploding/feathered W patterns or mosaics (1, 2). Your imagination is the limit.


Why Dasmascus steel is confusing terminology
The term Damascus steel is often used to refer to steel blades with interesting visual patterns, but it is a confusing terminology. Historically, swords with complex visual patterns were traded in the city of Damascus, Syria and were highly prized for their strength and beauty. However, it is likely that the swords and steel sold in Damascus were actually made from crucible steel. Visually interesting crucible steel, also known as Wootz steel in India, is made by melting and alloying different types of steel and iron together in a crucible, which can withstand very high temperatures. The impurities in the iron, such as vanadium and molybdenum, cause carbon to segregate around them when the molten steel solidifies, resulting in visible patterns.
Instead of referring to steel blades as Damascus steel, it is more accurate to use the terms pattern-welded steel and crucible steel. Pattern-welded steel is made by layering different types of steel and iron and then forge welding them together to create a unique pattern. Both of these types of steel can be further manipulated to create specific patterns, such as ladder and rose patterns. By referring to them specifically by their process, we can eliminate confusion and make it clearer how the patterns were created.
Acknowledgments
I would like to thank:
- GridMarkets for providing computational support for 3D rendering Houdini scenes.
- Alan Longmire, Emiliano Carrillo and Joshua States for providing photos for this article and their high quality contributions to the Bladesmiths Forum.
Video References
Equipped with a more solid understanding of pattern welding, you can follow me along in my videos as I created these patterns in reality: